
What a 3D-printed prototype enclosure actually costs in 2026
Jerome Privott · · 11 min read
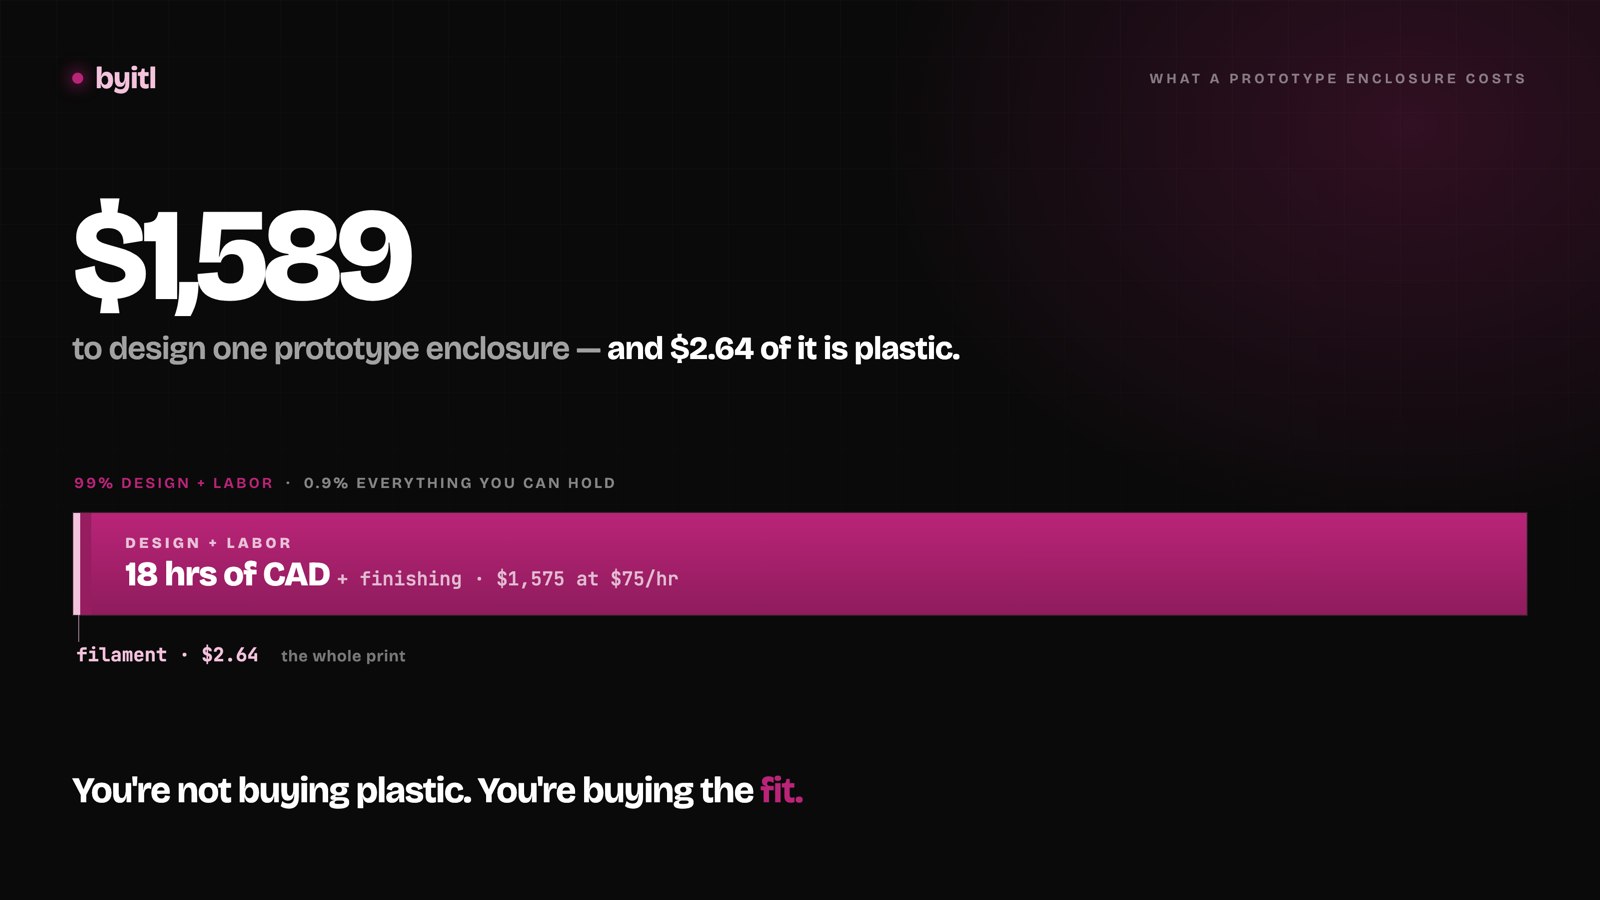
Search "3d print prototype cost" and you get the same answer twelve times: 120 grams of PLA at $22 a kilo, so about $2.64, plus a bit of electricity.
That number is correct. It is also close to useless.
Filament is under half a percent of what a prototype enclosure actually costs you. The rest is your time — the CAD hours to model a shell around a real board, and the three prints you throw away before the USB-C cutout lines up. If you're budgeting a project, budgeting the filament is like budgeting a house by the price of nails.
Here's the real breakdown.
The short answer
For one palm-sized enclosure around an ESP32 dev board, designed from scratch by someone competent in Fusion 360 or build123d, valuing their own time at $75/hr:
About $1,589. Of which $6.60 is plastic.
The full itemization is below, with every assumption labelled so you can swap in your own numbers. But that ratio — 0.4% material, 99% labor — is the whole point of this post, and it doesn't change much when you change the inputs.
What the material actually costs
Let's get the cheap part out of the way, because it is genuinely cheap.
Standard PLA runs $18–$24 per kg in 2026, with PETG at $20–$26 and ABS at $17–$23 (Snapmaker's 2026 filament pricing guide, May 2026). Budget brands go lower — around $10–$14/kg — at the cost of diameter tolerance, which matters more than people think when you're chasing a 0.2 mm fit.
Resin is a different story: $79–$250 per liter for standard and engineering SLA resins (Formlabs). Several times the material cost for the same part volume — and the part is more brittle, and needs washing and curing on top. Most prototype enclosures should be FDM.
Electricity is a rounding error. At 150 W and $0.17/kWh, a five-hour FDM print burns about $0.13 — that's the rate and method from 3dprinting.com's cost guide (last reviewed May 2026), which works the same sum for a three-hour print and gets $0.08.
The printer itself is cheaper than it's ever been. A Bambu Lab A1 mini lists at $299, the A1 at $399, and the P1S at a $699 MSRP that has repeatedly hit $399 on sale (Bambu Lab price history, Tom's Hardware). Amortized across a machine's life, a six-hour print costs you about a dollar in hardware.
Add it up and the physical cost of one prototype enclosure is somewhere between $10 and $15.
So why does the project take three weeks?
The line item nobody quotes: design time
Because before anything gets printed, someone has to model it. And modeling a fitted enclosure around a real board is not "sketch a box, extrude 30 mm."
Here's what actually has to happen:
Get the board's real dimensions. Not the dimensions on the product page. The actual outline, the actual mounting hole positions, and the actual height of the tallest component — usually an electrolytic cap or a shield can you forgot about. If you guess, you find out later, expensively.
Model the connector cutouts. A USB-C port isn't a rectangle. It's a rounded slot at a specific height above the board, set back from the board edge by a specific amount, with a shell that needs clearance for the plug's overmold — which is fatter than the connector itself. Get the setback wrong by half a millimetre and the cable bottoms out before it seats.
Design the mounting bosses. The board sits on standoffs at a height that clears whatever's on the bottom side. The bosses need to align with the board's holes to within a few tenths, be tall enough to clear bottom-side components, and be thick enough not to snap when you drive an M3 screw into them.
Design lid retention. Snap-fit, screws, or heat-set inserts — each has a different failure mode. Snaps are free but you'll iterate on the beam thickness. Inserts are reliable but you're now designing pockets sized for the specific insert you bought.
Add tolerance for the process, not the CAD. This is the one that gets people. Your model is dimensionally perfect. Your printer isn't. Holes come out undersized, outside corners get elephant-footed on the first layer, and vertical walls bulge. You have to design in offsets that compensate for your specific printer and filament, and the only way to know those offsets is to have printed on it before.
Call this 18 hours for someone who knows their tools but hasn't built this exact enclosure before. Experienced designers working from a template library go faster. First-timers go much slower — and burn most of the extra time on the tolerance problem, which is invisible until you print.
The iteration loop is where wall-clock disappears
You finish the model at 11 PM. You slice it, start the print, go to bed.
Six hours later you have a part. The board drops in — good. The mounting holes line up — good. You plug in USB-C and the cable stops 0.4 mm short, because the cutout is centered on the connector body instead of the connector opening.
That's a one-line CAD fix and another six-hour print.
Then the lid doesn't sit flush, because the walls bowed slightly and the lip is now interfering at two corners. Fix, reprint. Then the heat-set insert pockets are 0.1 mm too tight and the inserts sit proud. Fix, reprint.
Three loops is normal for a first enclosure. Each loop costs you maybe 40 minutes of hands-on CAD, a few hours of printer time, and — this is the expensive part — a full day of calendar. You can't test the fix until the print finishes, and you don't start the print until you're at the desk. A three-loop enclosure realistically eats a week of elapsed time even though it's only a day or two of actual work.
The grams you wasted on those three prints: about 180. That's $3.96.
Worked example: palm-sized ESP32 enclosure
Stated assumptions. An ESP32 dev board with USB-C, a 0.96" OLED, and four M3 mounting holes. Finished enclosure roughly 110 × 70 × 30 mm, two parts (base + lid), printed in PLA on an entry-level FDM machine. Three failed test prints before the fit is right. Your time is valued at $75/hr — swap in whatever your hour is actually worth, and note that this single number moves the total more than everything else combined.
| Line item | Assumption | Cost |
|---|---|---|
| PLA, final part | 120 g at $22/kg | $2.64 |
| PLA, 3 failed prints | 180 g wasted at $22/kg | $3.96 |
| Electricity | ~24 printer-hours, 150 W, $0.17/kWh | $0.61 |
| Printer amortization | $399 machine over an assumed 2,000-hour life, × 24 h | $4.79 |
| Heat-set inserts + M3 screws | 4 of each, estimated | ~$1.00 |
| Sandpaper, deburr tool, misc consumables | — | ~$1.00 |
| Physical subtotal | $14.00 | |
| CAD design time | 18 h at $75/hr | $1,350.00 |
| Support removal, sanding, insert install, fit testing | 3 h at $75/hr | $225.00 |
| Labor subtotal | $1,575.00 | |
| Total | $1,589.00 |
Two lines in that table are estimates rather than sourced prices, and I'd rather flag them than dress them up. The $1.00 of inserts and screws is a reasonable guess at four of each, not a quoted price. The 2,000-hour printer life behind the amortization figure is my own assumption — real service life swings hard on maintenance and duty cycle. Both are rounding errors against the labor lines, which is exactly the point.
Filament is 0.42% of that total. Everything physical together is 0.9%.
If you're a hobbyist, you probably read that table and thought "but my time is free." It isn't — it's just unbilled. If your enclosure eats a week you didn't plan for, that's a week your firmware didn't ship. The number to compare against isn't $14. It's whatever a week of your project is worth.
How the number changes at 1, 10, and 100 units
Design cost is fixed. It gets paid once, no matter how many parts you print. Everything else is marginal.
Marginal cost per additional unit, same assumptions plus 30 minutes of post-processing per part: $2.64 filament + $0.15 electricity + $1.20 amortization + $1.00 hardware + $37.50 labor = $42.49 per unit.
| Quantity | Total | Per unit | What dominates |
|---|---|---|---|
| 1 | $1,589 | $1,589 | Design time (99%) |
| 10 | $1,971 | $197 | Design time (80%) |
| 100 | $5,796 | $58 | Post-processing labor (65%) |
Two things worth noticing.
The crossover is around 35 units. Below that, you're paying for design. Above it, you're paying for hands-on finishing time — and design starts to look cheap.
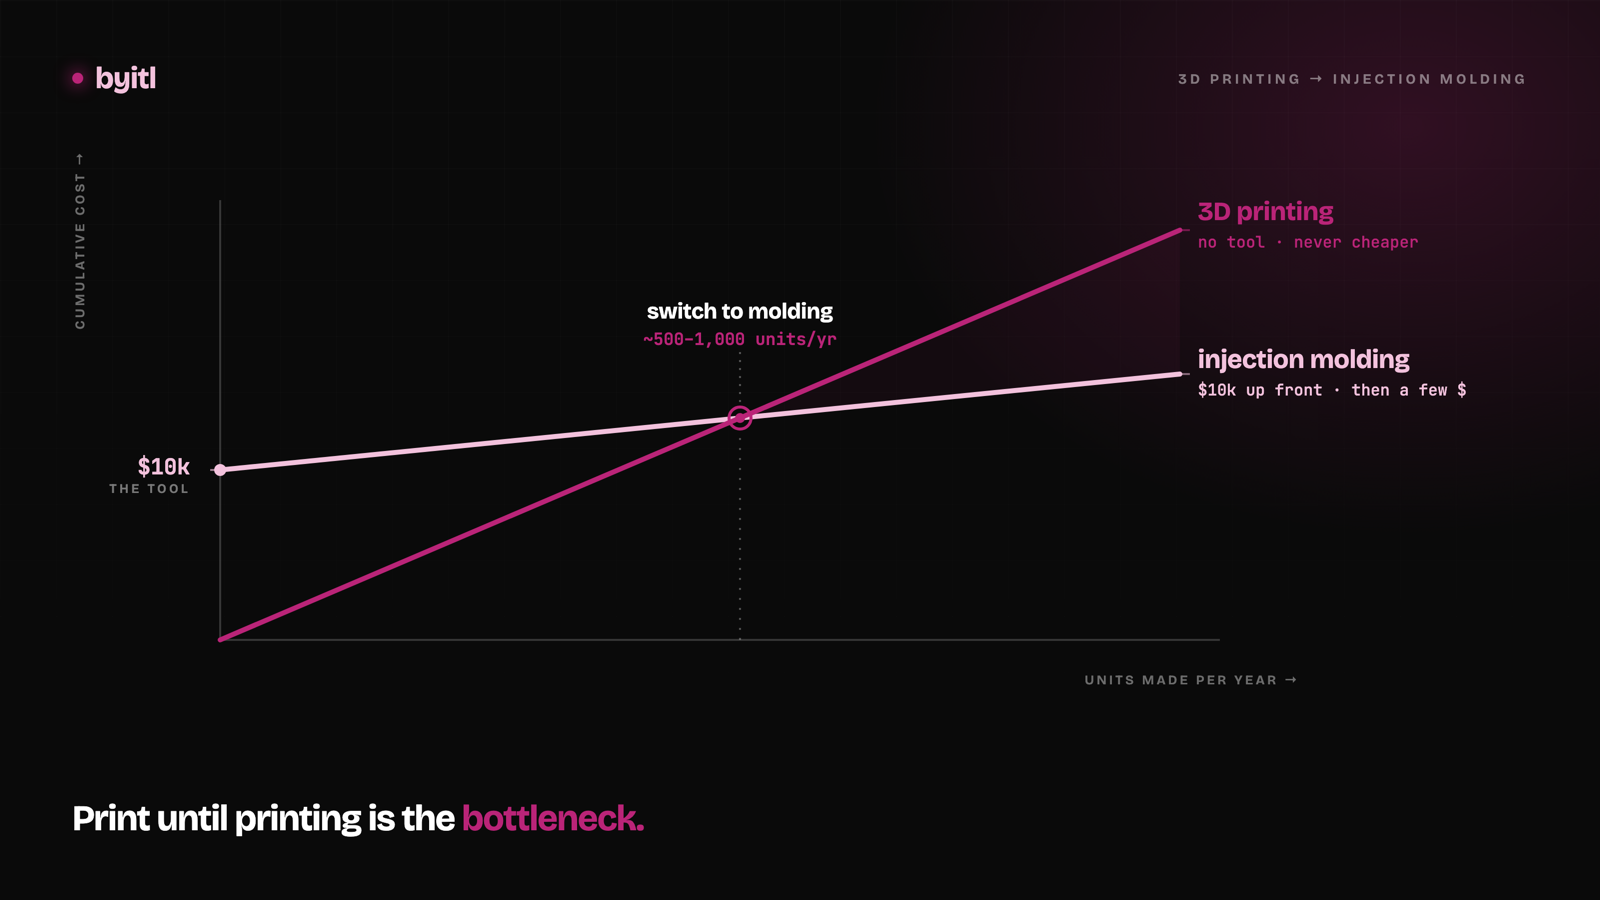
At 100 units, printing stops being the constraint and becomes the problem. A hundred six-hour prints is 600 printer-hours: 25 days of continuous, uninterrupted running on one machine. Plus 50 hours of your hands doing support removal and insert installation. This is the point where you stop printing in-house and start talking to a bureau — or, if you're confident the design is frozen, to an injection molder.
If you outsource, know what you're actually buying
Print bureaus print. They do not design. Bureaus quote per uploaded file rather than publishing a rate card, so treat any per-gram figure as a planning band and not a price. 3dprinting.com's cost guide puts online FDM at roughly $0.05–$0.15 per gram plus a $3–$10 setup fee per part, landing a 100 g part at $8–$25 before shipping, with resin at $0.20–$0.50/g and SLS/MJF/metal at $1–$10 per cubic centimetre (3dprinting.com, last reviewed May 2026). JLC3DP, PCBWay and Craftcloud all quote instantly from an uploaded file rather than off a published price list (JLC3DP).
Read that carefully: a bureau replaces the $14 line, not the $1,575 line. You still have to hand them an STL, which means you still have to do the CAD. Bureaus are a good deal for volume and for materials you can't run at home. They do nothing for the part of the problem that actually costs money.
CAD freelancers. Public rate data puts this work in the high-$20s to low-$40s an hour: Payscale's average for a mechanical designer with CADD skills is $29.18/hr, with the 10th-to-90th percentile band running $22.74–$40.97 (Payscale). Freelance marketplaces quote per person rather than off a schedule, so expect more spread than that in either direction. At 18 hours, the Payscale band works out to roughly $410–$740, which looks like the obvious win.
The honest caveat: hourly means the meter runs during the parts you can't control. Scoping calls, revision rounds, and the days spent explaining that a USB-C cutout has a setback dimension. A freelancer who has modeled fifty enclosures is a bargain. One who mostly does architectural drafting will bill you for learning your problem. The rate isn't the risk — the hour count is.
Design agencies. The consultancies that genuinely understand electronics enclosures generally won't quote the enclosure on its own — it's one phase of a multi-week development program, and published minimums sit in five figures. That is not a rip-off. It buys DFM, multiple revisions, material specification, supplier qualification, and someone accountable when a mold comes back wrong. If you're going to production tooling, it's the right purchase. For a v1 prototype that needs to exist by Friday, it is the wrong shape entirely.
Flat-fee design. Fixed price, fixed scope, fixed deadline. You trade the freelancer's flexibility for a number you can put in a budget.
Where byitl sits
byitl is the flat-fee option. $1,500, delivered in 72 hours.
You get a print-ready STL, an editable STEP, three angle renders, a BOM, and mounting-and-cutout verification against your actual board. One revision is included. If the 72 hours are missed, it's fully refundable.
The limits, stated plainly:
- byitl does not print or ship parts. This is design only. The $14 of filament and machine time in that table is still yours, or you send the STL to a bureau for $8–$25.
- This is a fit-and-function prototype, not production tooling. Injection-mold DFM is a different, separate engagement.
- One revision. If your board is still changing weekly, wait until it isn't.
Compare it against the table honestly. If your own hour is worth $30 and you enjoy CAD, doing it yourself is cheaper on paper and you'll learn your printer's tolerances, which is worth something. If your hour is worth $150 and the enclosure is the thing standing between you and a demo, the math stops being close.
The takeaway
Filament costs $2.64. That's the answer to the question everyone asks, and it's why everyone budgets this wrong.
The enclosure costs a week.
If you've got a board and a deadline and you'd rather not spend that week in Fusion 360 at 2 AM, that's what byitl does. If your board is still in flux, or you actually want to learn the CAD, don't hire us yet — the table above is genuinely all you need to plan it yourself.
Related
Designing Antenna-Friendly Enclosures for ESP32-S3: RF Clearance, Wall Thickness, and Material Loss
Placing an ESP32-S3 PCB inside a 3D-printed enclosure can degrade Wi-Fi and BLE signal strength by 3 dB to over 15 dB if you ignore ground plane clearance, dielectric loading, and filament selection. Here is the mechanical guide to preserving RF performance.
· 5 min read
From 3D-printed enclosure to injection molding: when to switch
A single-cavity prototype steel tool for a palm-sized enclosure runs about $10k — we've had our own parts quoted. Here's the break-even math on when it pays.
· 10 min read
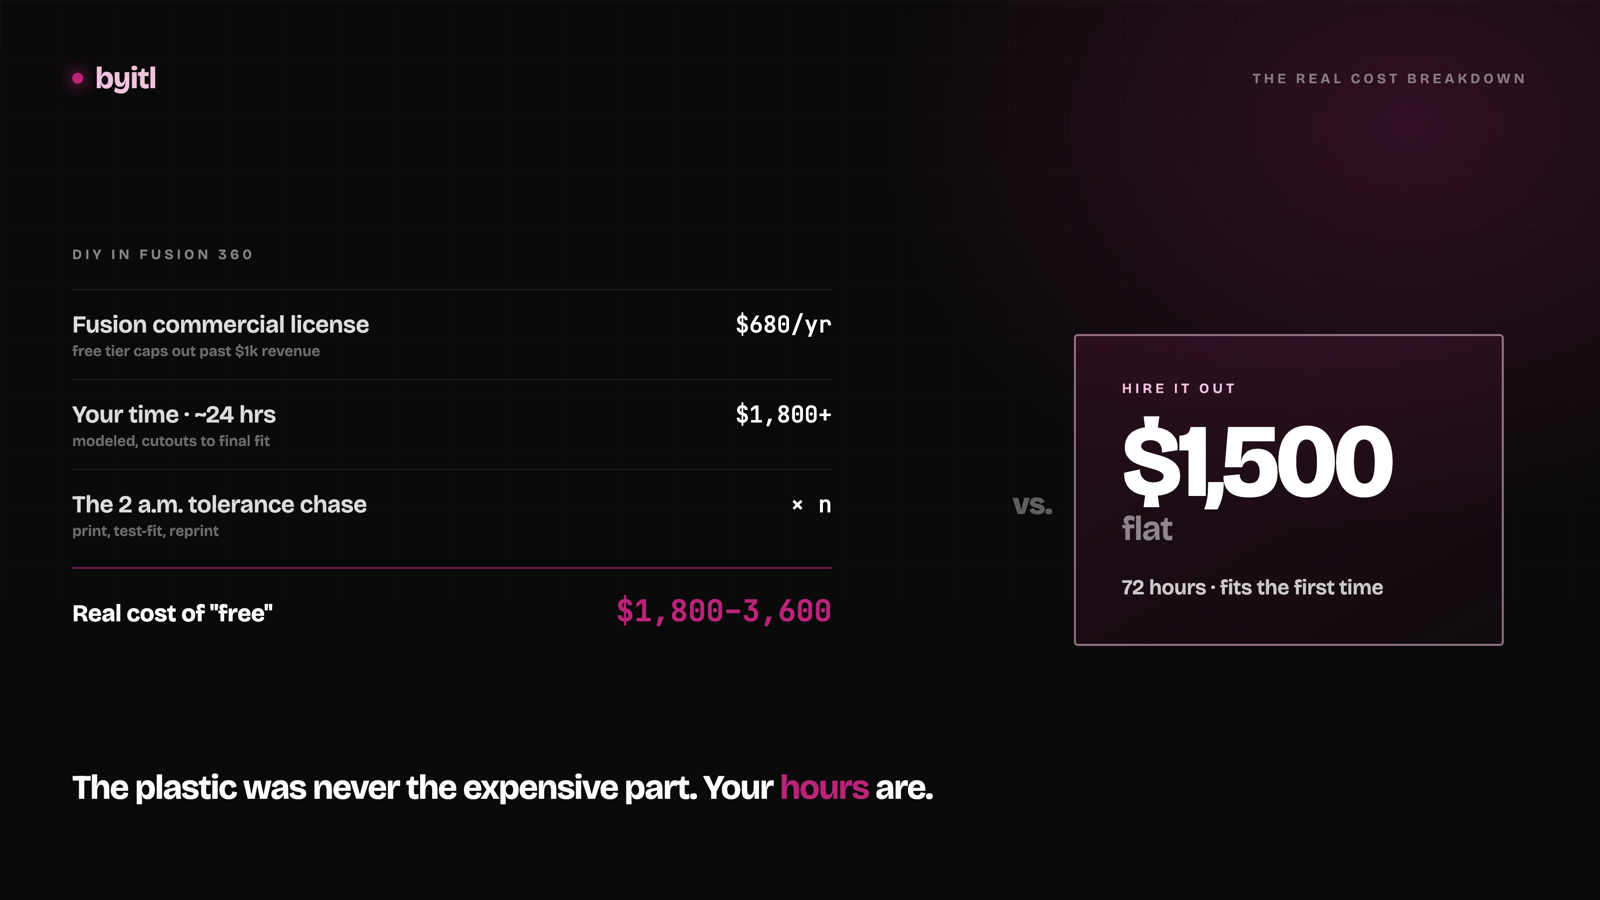
DIY your enclosure in Fusion 360 vs. hiring it out — the real cost breakdown
DIY in Fusion 360 is right for some founders. Here's the exact line where it stops being cheaper — license terms, tolerance stacks, real hours.
· 8 min read