
From 3D-printed enclosure to injection molding: when to switch
Jerome Privott · · 10 min read
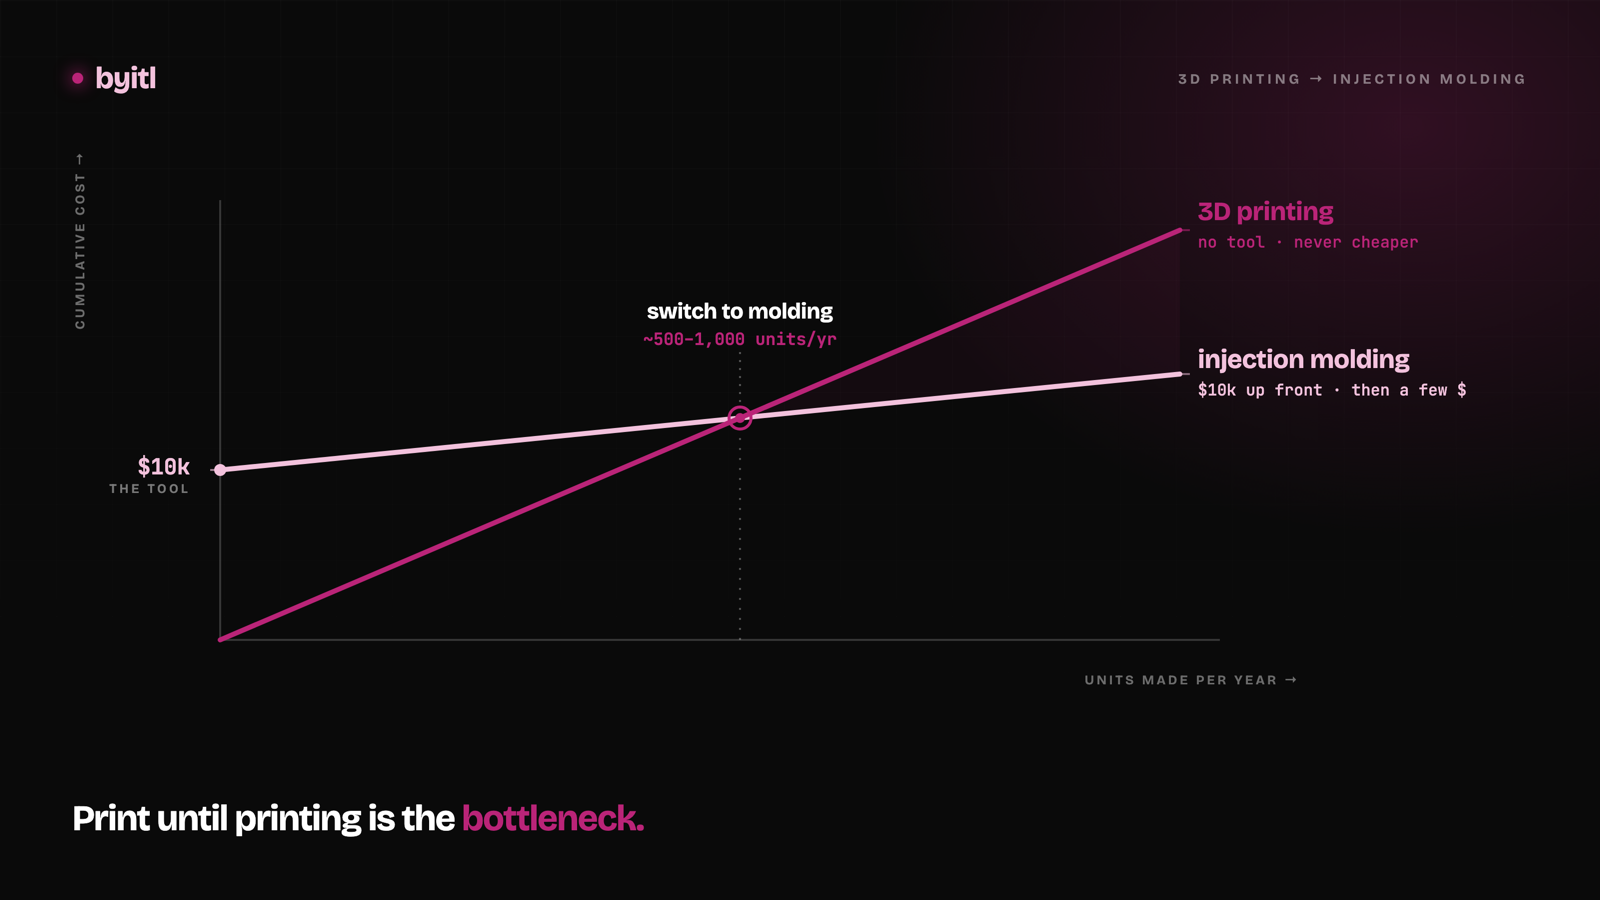
We've had our own parts quoted. A single-cavity prototype steel tool for a palm-sized enclosure runs about $10k.
That's a real fab number, not an estimate. And it's the number that should anchor this entire decision — because everything else about injection molding is downstream of writing that check.
Your prototype works. The board fits, the connectors line up, the lid closes. Now someone on your team — probably you, at 1 a.m. — is wondering whether it's time to tool up. This post is the framework for answering that.
The short version: print until printing is your bottleneck. Most teams asking this question are 2–3x too early.
The two cost structures
Printing and molding aren't two speeds of the same thing. They're two different cost shapes.
Printing is nearly all variable cost. Zero upfront. Every part costs what it costs — machine time, material, and the human who pulls supports off it. Part 1 and part 900 cost the same.
Molding is mostly fixed cost. About $10k for that prototype steel tool, then a few dollars per part. Part 1 costs the price of the tool. Part 900 costs a few dollars.
Everything below is just working out where those two lines cross.
The break-even math, worked out
Here's the formula. It's not complicated, and you should run it with your own numbers before you talk to anyone about tooling.
break-even units = tooling cost ÷ (printed cost per unit − molded cost per unit)
The trap is the denominator. It's the difference, not the printed cost. And that difference depends almost entirely on how honestly you price your own printing.
Read this before the numbers below. The $10k tool is the only real figure in this section. Every per-unit price in the three scenarios — $18, $8, $4 — is an assumption we picked to show how the formula behaves. They are not quotes, they are not market rates, and nobody quoted us $18 to print a part. Treat the scenarios as a template with our placeholders in it: delete our numbers, put in what your printer or your bureau actually charges you, and the answer you get is the only one that means anything. If you take one number from this post, take the $10k. If you take a second, take your own.
Scenario A: you price printing at material cost
Assume $4/part molded and $4/part printed — both placeholders — against the $10k tool.
$10,000 ÷ ($4 − $4) = never
The tool never pays back. If printed and molded parts genuinely cost you the same, molding is not a cost decision at all — it's a decision about finish, repeatability, material properties, or throughput. Those can be excellent reasons. They're just not the reason you told yourself.
One clarification worth making, because the shorthand trips people up. When we say elsewhere that printed parts "cost about the same per unit," that is a statement about the shape of the printing curve — part 1 and part 900 cost the same as each other, because there's no volume discount and no tool to amortize. It is not a claim that printing costs the same as molding. Scenario A is the specific case where those two numbers happen to converge, and when they do, the tool has nothing to pay back.
This is the scenario most founders are actually in, and they don't realize it, because the printer is sitting in the corner and its time feels free.
Scenario B: you outsource printing and count the real cost
Assume $18/part printed (a service bureau, post-processing included) and $4/part molded — again, placeholders — against the $10k tool.
$10,000 ÷ ($18 − $4) = $10,000 ÷ $14 ≈ 715 units
Roughly 700 units to break even.
This is the scenario we mean when we say molding typically starts paying at roughly 500–1,000 units a year: printing priced at what it actually costs you, whether that's a bureau invoice or your own loaded rate. That band isn't a constant of manufacturing. It's just what the formula returns across a plausible spread of real printing costs once printing is genuinely more expensive per part than molding. Move the printed figure and the band moves with it.
Scenario C: you print in-house but count labor
Assume $8/part printed (your machine, your time, priced at something) and $4/part molded — placeholders — against the $10k tool.
$10,000 ÷ ($8 − $4) = 2,500 units
2,500 units before the tool pays for itself.
What the three scenarios actually tell you
The crossover isn't a fact about manufacturing. It's a fact about your accounting.
At 200 units a year, only Scenario B reaches payback at all, and it takes more than three years to get there — long enough that you've likely revised the design, and the tool with it. At 5,000 a year, every scenario where printing genuinely costs more than molding clears inside the first year. Scenario A still never clears, at any volume, because there is nothing there to pay back.
The interesting zone is 500–1,000 a year, and there the answer is genuinely "it depends on what your printing really costs" — which is a question you can answer today, with a spreadsheet, for free.
What the $10k doesn't cover
The tool quote is the visible number. These are the ones that show up later.
Lead time. Steel tooling is measured in months. Protolabs puts it plainly in its aluminum vs. steel tooling comparison: aluminum molds get you parts in days, where steel takes months. Add that to your ship date before you commit, not after.
Design lock-in. This is the one that hurts. Once steel is cut, every revision costs real money. Adding material to a steel tool means welding and re-machining or cutting a new insert. You can remove steel cheaply; you cannot add it back cheaply. A design change that costs you an afternoon in CAD and a few dollars of filament today can cost thousands and weeks once the tool exists.
If your firmware team is still moving connectors around, you are not ready. If you haven't put the enclosure in front of real users, you are not ready.
Minimum order quantities. Molders have a floor. Setup, purging, and material changeover cost the same whether you run 200 parts or 2,000, so you'll often be quoted a minimum run that's larger than what you actually want in a box right now. Ask about MOQ before you ask about part price.
Tool life. Protolabs rates aluminum tooling as usable for 10,000 cycles or more, depending on material type and geometry, where hardened steel runs into the millions. For most hardware startups, aluminum outlives the product revision it was cut for — which is an argument for aluminum, not against it.
The middle ground nobody pitches you
The choice is not printed-or-tooled. There are bridge processes that sit between them, and they're often the right answer for exactly the volume where this question comes up.
Urethane casting. A silicone tool taken off a master pattern. Silicone molds wear out, and that's the binding constraint: Formlabs puts a standard silicone mold at roughly 50 casts, with high-temperature vulcanized silicone stretching to several hundred per mold. So the ceiling isn't really a property of the process — it's how many molds you're willing to pay for before the arithmetic stops making sense. In practice that keeps this a tens-to-low-hundreds option rather than a production one. What it buys you is molded-looking parts, real cast materials, and cosmetic finishes without cutting steel.
CNC machining. Expensive per part, zero tooling, tight tolerances, real production materials. Good for a small run of parts that have to be dimensionally correct and structurally real — certification units, trade show samples, a first customer batch.
Aluminum bridge tooling. A real injection tool, just softer and faster to cut. Costs meaningfully less than steel and arrives in a fraction of the time. If you're confident in molding but not yet confident in the design, this is frequently the right call — you get molded parts and molded economics, and you haven't bet the design on a tool that outlives it.
What changes in the design when you move to molding
This is the part that surprises people. A print-ready file is not a moldable file. The geometry has to be reworked, not just re-exported.
Here's what changes and why.
| Design change | Why molding requires it | What it does to your part |
|---|---|---|
| Draft angles | The part has to release from the tool without scraping | Vertical walls get tapered. A common rule of thumb is roughly 1 degree per inch of cavity depth; deeper features need more |
| Uniform wall thickness | Thick and thin sections cool at different rates | Solid chunks get cored out. Non-uniform walls drive sink, warp, internal stress, and dimensional inaccuracy — this is the single most important molding rule |
| Undercut elimination | Anything the tool can't pull straight off needs a side-action or a lifter, which adds cost | Snap features, side ports, and internal lips get redesigned or moved to the parting line |
| Parting-line placement | The tool has to split somewhere, and it will leave a visible witness line | You choose where the seam lands, or the molder chooses for you — usually somewhere you'd rather it hadn't |
| Gate placement | Plastic has to enter the cavity somewhere and leaves a mark | A cosmetic surface gets protected; flow length and weld-line positions get considered |
| Ejector-pin locations | Pins push the part off the core and leave witness marks | Flat internal areas get reserved for pins; you accept small circular marks on the inside |
| Sink-mark avoidance | Thick sections shrink as they cool and pull the surface in | Bosses get cored, ribs get thinned. Rib and boss thickness typically lands around 40–60% of the adjacent wall |
The draft, wall-thickness, and rib/boss figures above follow Protolabs' uniform wall thickness design guidance. None of this is exotic. All of it is work, and none of it is in a file that was designed to be printed.
A checklist: are you actually ready?
Tick these honestly. If more than one or two are unchecked, keep printing.
- The electrical design is frozen. No pending connector moves, no "we might add a second USB port."
- Real users have handled the enclosure and you've absorbed that feedback.
- You know your annual unit volume within about 2x — not your hoped-for volume, your committed volume.
- You've run the break-even math above with your own per-part printing cost.
- Your printed per-unit cost is meaningfully higher than a molded quote, not roughly equal.
- You have a molder identified and a quote in hand, including MOQ.
- You can afford the tool and a revision to it.
- Cosmetics, material properties, or throughput demand molding — or the volume math clears on its own.
That last one matters. Sometimes the right answer is "the math doesn't work but we need the surface finish." That's a legitimate reason to tool. Just name it as the reason.
Where byitl fits
We build working prototypes: the circuit board, the firmware and the enclosure, designed together, with one assembled unit at the end. From $7,500, 4–6 weeks. The enclosure files we deliver are fit-and-function prototype files, explicitly not DFM-certified for production tooling, and we say so up front because the alternative is you finding out from a molder.
When you've actually crossed the line — the checklist above is ticked, the math clears, the design is frozen — redesigning the enclosure for injection molding is a separate engagement we quote case by case: draft, uniform walls, undercuts, parting line, gates, ejector locations.
But most teams reading this aren't there yet. If that's you, the honest advice is the cheap advice: keep printing, and come back when printing is what's slowing you down.
Still building the device itself? See how a full prototype works.
Related
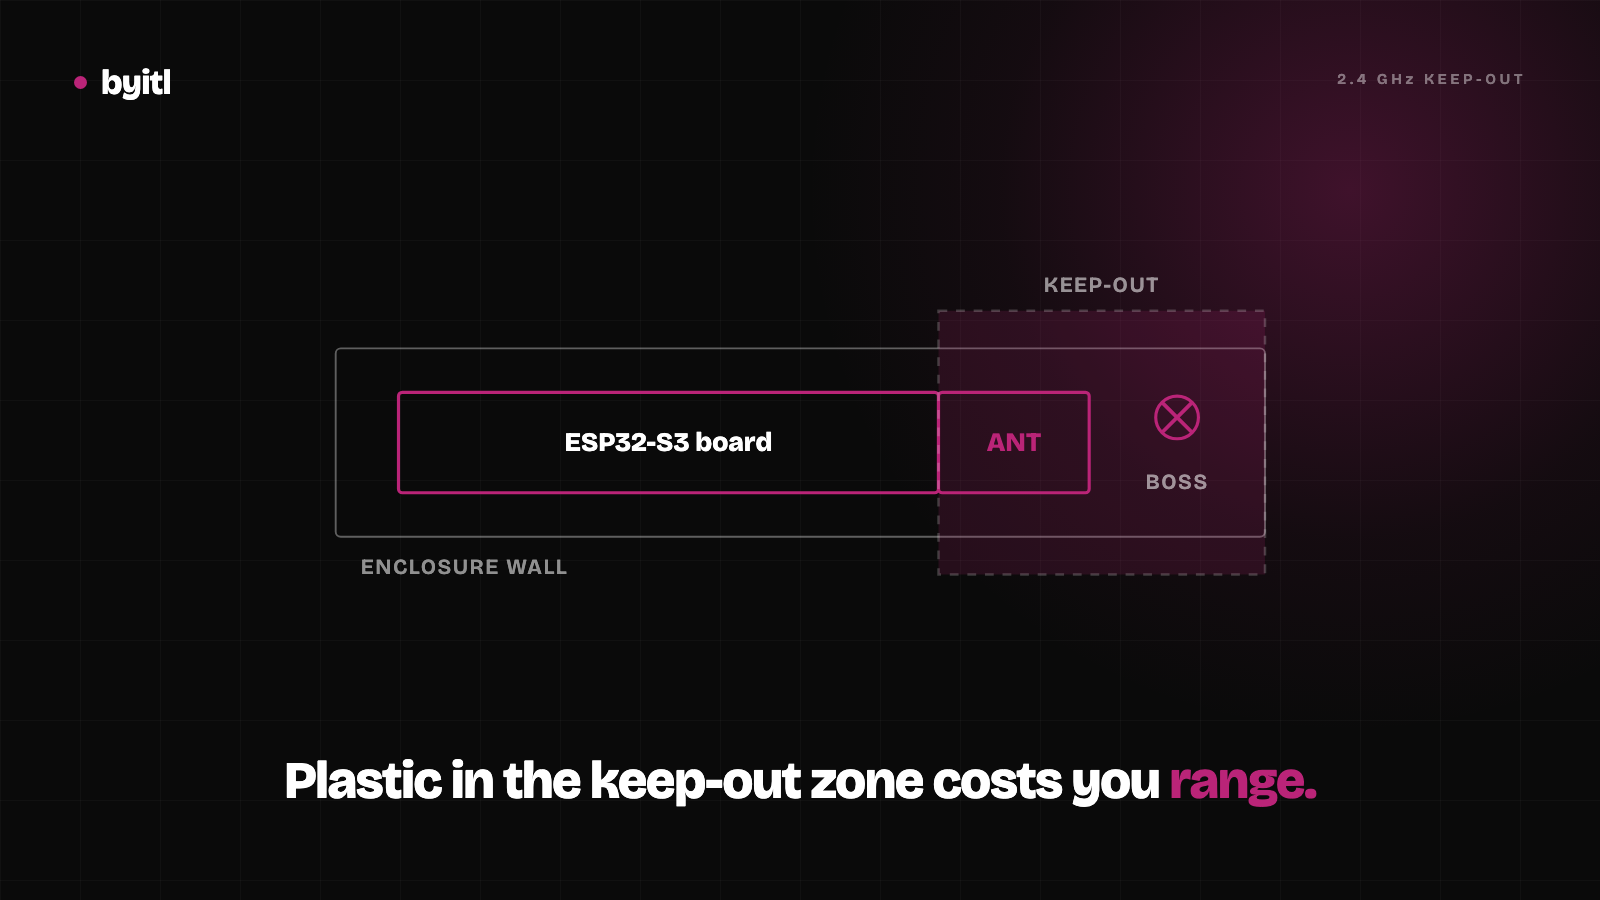
ESP32-S3 enclosure design: give the antenna its 15 mm
Espressif asks for at least 15 mm of clearance around an ESP32-S3's PCB antenna inside the housing. What that means for a 3D-printed case, with sources.
· 6 min read
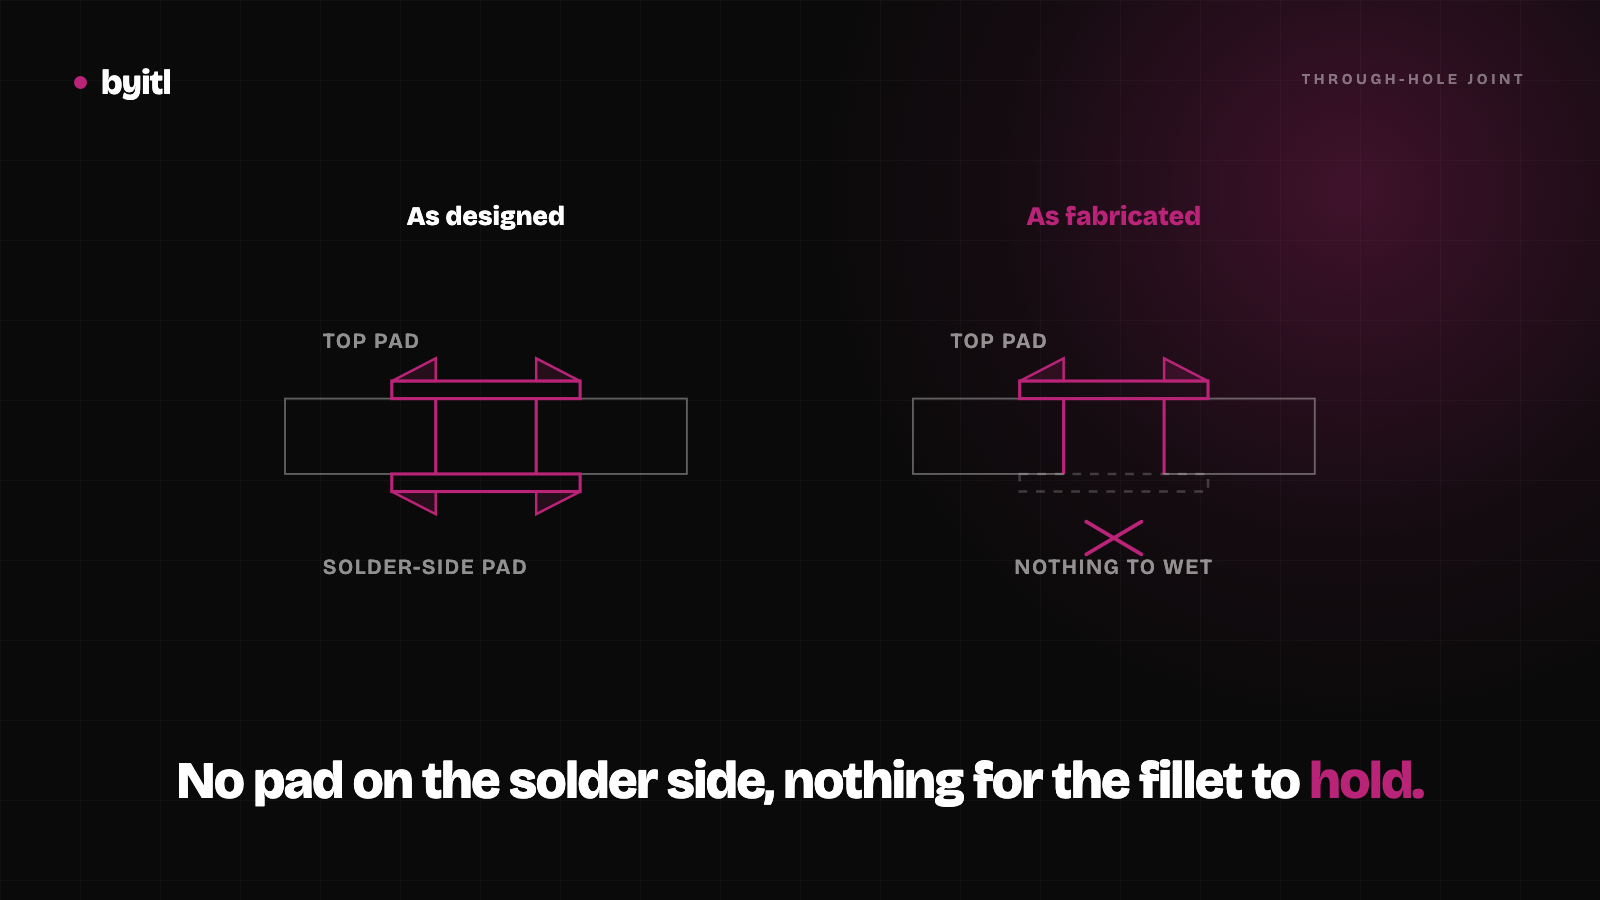
We told the fab the missing annular rings were intentional. They weren't.
Part two. The fab asked about one thing before building. We said it was deliberate. It was a parser bug, and it explains the open display headers.
· 8 min read
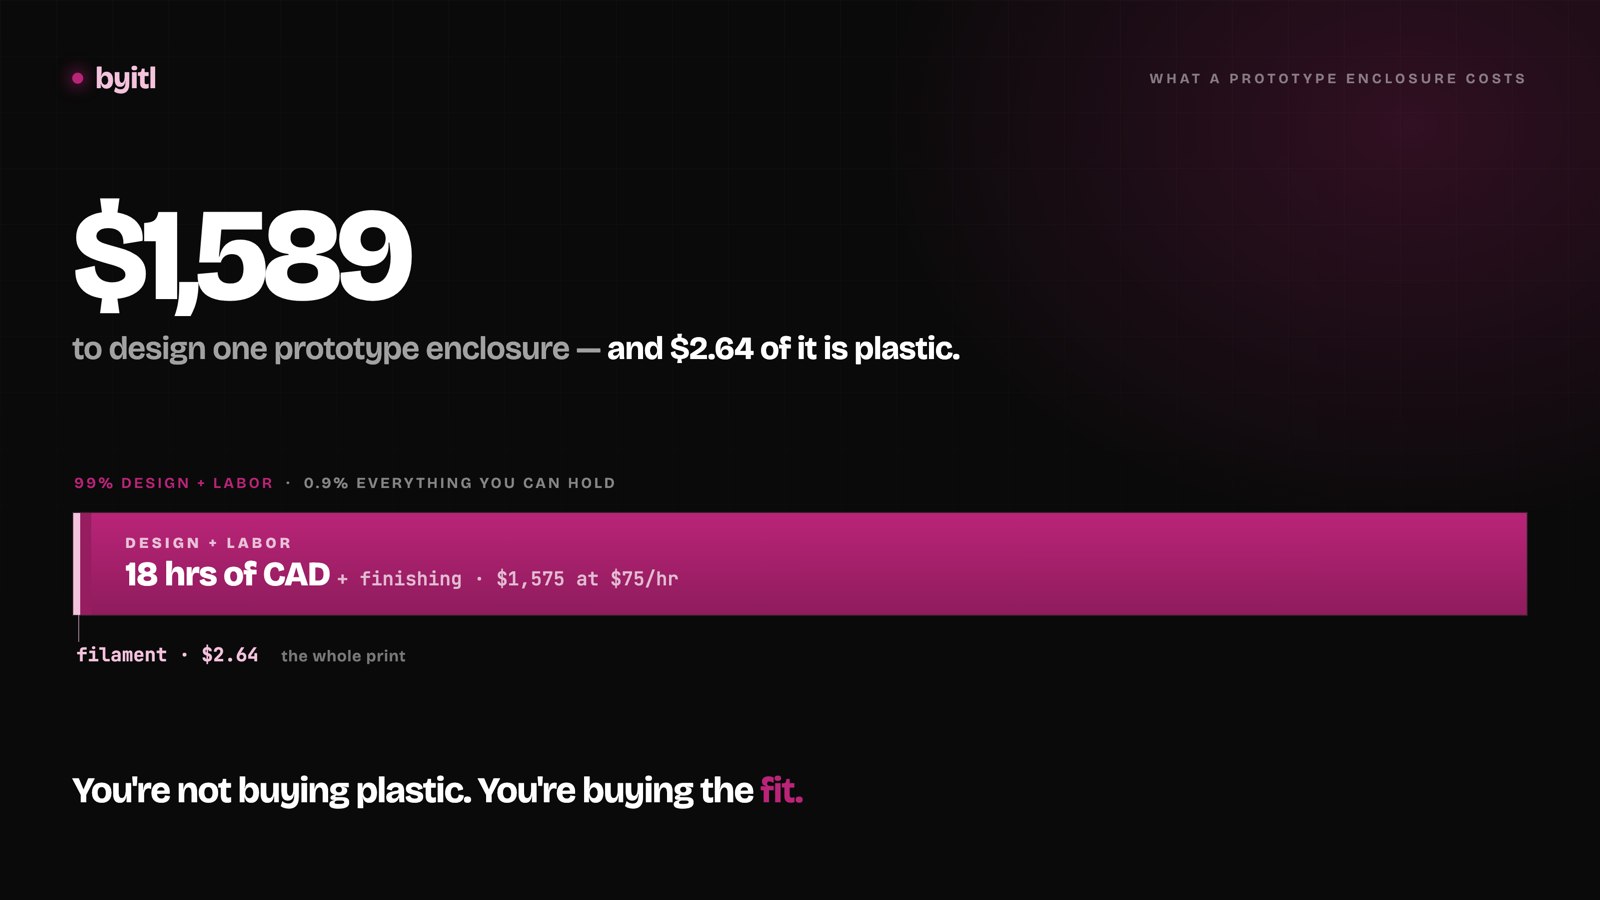
What a 3D-printed prototype enclosure actually costs in 2026
Filament is under half a percent of the bill. Here's the itemized total for a palm-sized ESP32 enclosure, design time included.
· 10 min read